Saturday, April 30, 2011

Taco Time!


A few months ago, I saw this interesting contraption going around on my sister and brother's facebook page. I had no idea what it was, so the next time I saw her I asked her what it was. That is when she introduced me to my newest favorite kitchen product, Tupperware move over, ha!


Here they are on their first new years together!

The Taco Press! Here is it in its full glory, made just for me by my brother-in-law who has real skills!


We made our first homemade taco's last night, and they were delicious! I mean so very melt in your mouth good. Andrew scarfed his down, and Matt definitely approved too!


My original thought in making these myself was, we could make them inexpensively compared to the organic ones we buy now, but when I put them in my mouth, all I could think was how delicious they were.


So here is how I made them.


Ingredients:
2 cups flour ~ I prefer half a whole wheat and half white flour mix
4 Tablespoons butter
1/3-1/2 cup water
1 teaspoon salt


I combined the flour in a bowl then cut in the cold butter, think pie dough making here. I used my Quick Chef Pro chopper but you could use two butter knives. It blended perfectly. Then I added water slowly until the dough is a little thinner and tackier than pie dough.


Placing a lump of dough the size of two tablespoons inside gallon size baggie (that had one seam cut open I put it in the taco press, press down as hard as you can and whalaa a nice thin taco.


I pan fried them with a little vegetable oil for less than 30 seconds on each side. They were crisp on the outside, and just a bit soft on the inside. We served the usual insides of meat, vegetables, and fixin's, it was a great meal. It was healthy, frugal, and delicious!


Warning Frugal Nerd Alert!


Because I am a bit of a frugal nerd here is how my cost comparison broke down for the taco's


Organic soft tacos: $2.79 for a 10 count package = .27 per taco
Homemade soft tacos: $.70 for 12 tacos = .06 per taco


Ok so that doesn't look like much savings right? Well saving cents makes cents! Actually I have another post about changing behaviors to save cents that add up quickly to many dollars coming soon.


Thinking about it we eat lots of tacos in this house. So lets just say we eat...


10 tacos per week x 53 weeks a year = 147.87 is what we would spend on store bought tacos and my homemade tacos that would cost us 31.80, which saves us 116.07 a year. Yep I am a nerd but the cents do really add up!

Thursday, April 28, 2011

My Lovely Lips Are Lovin' Me!


When I made my first "homemade product" over a year ago. I was such a consumer. It wasn't quality if I didn't buy it right? I was just looking to be frugal. Wrong! Instead of frugal, I am making high quality products for pennies compared to store bought


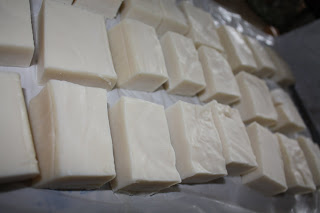
Recently the make-my-own bug has bitten me. Renee over at FIMBY has been motivating me for several months now...and so after loving my laundry soap, then deodorant (will never buy Secret again), followed by my homemade soap which is curing right now awaiting my Mother's Day. I have yet again made something I will never go back to buying! My lips are in L.O.V.E.

I must give Renee the credit for the recipe. I am still learning, but the more I make my own, the more I am branching out to create my own.

I think the hardest part of making my own products is actually gathering the supplies. In this case most of my ingredients came from my local organic health store. Once I have them on hand, it takes no time at all to be reaping the benefits of my own goods.

A few of you have asked where I got my supplies, so I noted it for you. I am sure you could get it online too.

Ingredients

  • 1/2 oz. (approx. 3 tsp.) grated or roughly chopped beeswax (local organic Co-operative)
  • 1 oz. (approx. 6 tsp.) coconut oil (local organic Co-operative)
  • 1 1/2 tsp. lanolin (Left over from Breast feeding my babes)
  • 3/4 tsp. vitamin E (I had capsules in my cabinet and poked holes in them to add up)
  • 2 tsp. hard honey (local organic Co-operative)
  • 3/4 tsp. peppermint essential oil (local organic Co-operative)


Assemble what you need:
This actually takes the longest, the making is a breeze!


Grate the beeswax and melt with the coconut oil, Lanolin, and Vitamin E. It was the consistency of vegetable oil when melted completely.

Second add the Peppermint extract and Raw honey (some know it as hard honey). If you are buying it new for this purpose I would scrape the top and use for something else. Particles don't break down well.


Mixing the peppermint extract and Peppermint was tricky to incorporate. You have to be really fast. I started with a wooden dowel but quickly moved to a rubber spatula which worked so much better for me.


I did have to reheat some to pour it in. I do not prefer the tubes, as much as the round containers. It goes on so smooth and the peppermint is yummy and tingly.


The best part of making my own, is there is always plenty to share with others. I love being able to pass some on to family and friends to enjoy as well.


Try it for yourself and let me know how you like the recipe. If I can do this you you definitely can do this!

Wednesday, April 27, 2011

Whimsical Wednesday ~ 20 things to do with Ice cube trays!

I stumbled upon this list of uses for Ice cube trays. I never thought of a few of these!

1. Pesto: Fill each cube with pesto, seal and freeze. For easy preparation, place cubes in a stainless steel mixing bowl and rest the bowl over a Dutch Oven pot of cooking pasta (for a makeshift double boiler). The heat from the boiling water will melt the cubes
just in time to toss with the hot pasta.


2. Lemon & Lime Juice: Fill each cube with lemon/lime juice, seal, and freeze. Remove as needed for adding that zing or lemons/lime flavor to cooking or baking.


3. Homemade Baby Food: Freeze small amounts pureed fruits, vegetables, starches, and meat in each cube. Fill each cube, seal, and freeze for fresh, unprocessed baby food. To use, take out the desired number of cubes and thaw or reheat before feeding.


4. Fresh Herbs: Chop fresh herbs. Transfer 2 tbsp. of herbs into each cube, fi ll with approximately 1 tbsp. of water per cube, seal and freeze. Store until you are ready to add them to sauces, soups, stews or salsa.


5. Leftover Wine: Fill each cube with any type of wine, seal, and freeze. Perfect for adding to sauces. There may be a small difference in color of the sauce but will not affect the taste.


6. Juice & Pudding Popsicles: Fill each cube with juice or pudding, seal and freeze. When ready to eat, remove from freezer, place in a snack cup and let it slightly thaw until it becomes the consistency of an Italian Ice.


7. Frozen Fruit Chunks: For the perfect garnish for a sparkling summer drink, place assorted fruits into each cube including strawberries, lemon/lime zest, raspberries, pineapple, or grapes. Fill the remainder of the cube with water, seal, and freeze.


8. Buttermilk: Fill each cube with buttermilk, seal and freeze. Buttermilk can be frozen to be used in baking. If you would like to use it to make salad dressing, place in a chopper and blend it till it returns to its original consistency.


9. Egg Whites & Egg Yolks: Fill each cube with egg yolk/egg white, seal and freeze. Use for recipes that call for egg white or egg yolks.


10. Pancake, Waffle, & Crepe Batter: Fill each cube with batter. Seal and freeze. Place a cube on a hot fry pan, let it spread out then cook as normal without the fuss.


11. Coffee & Tea: Don’t water down your drinks. Fill each cube with coffee or tea, seal, and freeze. Use in place of ice for iced coffee or tea.


12. Tomato Paste & Tomato Sauce: When all you need is a small amount for a recipe, fi ll each cube with tomato paste or sauce, seal, freeze and use as needed.


13. Leftover Gravy: Fill each cube with leftover gravy, seal and freeze. Remove and use as needed.


14. Flavored Cubes: Fill each cube with your favorite fruit flavored drink or juice, seal and freeze. Use to flavor ice tea or other beverages or to add
flavor to water in your favorite re-usable bottle.


15. Onions, Garlic, Chilies, Carrots, & Celery: Chop vegetables, and transfer 2 tbsp. into each cube, fill with approximately 1 tbsp. of water per cube, seal and freeze. Perfect for adding to casseroles, sauces, soups, stews or salsa.


16. Chocolate Molds or Fudge: Prepare chocolate or fudge according to directions. Fill the cube with the chocolate, seal and freeze until firm. To loosen run a small knife under hot tap water and loosen the edges.


17. Leftover Condiments: Fill each cube with leftover condiments like mustard, ketchup, barbecue sauce, salsa, or relish, seal and freeze. Thaw and use as toppings or in recipes.


18. Cookie Dough: Always have fresh baked cookies on hand. Fill each cube with a heaping teaspoon of cookie dough, seal and freeze. Thaw slightly, place on cookie sheet and bake as directed in recipe.


19. Stocks, Broth & Sauces: Fill each cube with stock, broth or sauce, seal, and freeze. Remove and use as needed.


20. Gelatin Squares: Prepare gelatin square recipe on packaging. Refrigerate until firm. To loosen, run a small knife under hot tap water and loosen edges.

Ok your turn, what other uses can you find for Ice Cube Trays?

Wanted to add, I found a great blog post for a 21st idea! Go check it out. Yum http://www.thetidynest.com/2010/09/freezer-smoothies.html

Tuesday, April 26, 2011

How-To Tuesday ~ Clothes Pin Bag

The warm weather is upon us here on the East Coast as we head into the month of May. It is time to start hanging out laundry again. I am starting the year with a fresh clothes pin bag. Here is how I did it! I will add some pictures when I get them uploaded.

1. Find a button up children's shirt (3T or 4T works great)

2. Hand or machine sew the bottom of the shirt together, creating a pocket.

3. Hang on a plastic hanger.

4. Unbutton the shirt when you need to use it, and button it back up when you are done. OR leave it open all the time which is what I do.

Whala! You have a clothes pin bag for cheap or like in my house ~ Free! It stays on my clothes line most of the summer.

Sunday, April 24, 2011

A Love of Learning ~ Science


Do you really have to teach a child to love learning new things, or is it more like preserving their love of learning?


This is something I have been pondering lately. I love to learn and as I consider homeschooling my children, I want them to love to learn too. I always have enjoyed learning new things. I remember my mother who has been homeschooling her children for 27 years teaching us "how to to learn something" but did she really teach us to love learning? I don't think so.


I remember asking where silk came from as a young girl. My mother took me to the library (there was no internet in those days, YES, there was electricity) and showed me the card catalog and how to find what I was looking for. Still the desire to soak in new knowledge and understanding is something that comes from much deeper.


This weekend we ended up in the most awesome science center geared towards elementary and middle school age learning. So much to absorb and enjoy. They had microscopes that children could use, and live animals.


I.had.a.blast! (the kids did too)


While there they had a special project going where they dropped an egg that you had to design a protective cover for. Ours made it!

(getting ready to drop the egg)

(YAY! It made it, it sure did make a loud cracking sound as it hit)


This is what I want for my two boys. When I watch them learning something new, I realize I am preserving their love of learning not teaching them to love it. By providing opportunities for them to grow and excel as they walk through life they will continue to learn and love doing it.

Friday, April 22, 2011

Frugal Friday - Dryer Balls

Reducing Electricity = More $$ in my pocket!

These Dryers balls are my latest whimsical attempt to be frugal by keep our electric costs low, and use our energy resources responsibly. I do enjoy hanging my laundry on the clothesline but sometimes that just is not possibility. So when using the dryer I throw 6 of them in with my wet laundry to lower the amount of drying time.

Making them is simple! I made them while resting one afternoon during nap time.
Buy or reclaim (Thrift shops always have wool sweaters you can pick up for next to nothing) about 3oz of 100% wool. Roll a tight ball about half the size of a tennis ball.

Next I tied them in a pair of nylon panty hose with a knot at either end. I used a pair of support hose from 2 pregnancies ago since that is what I had in the house. Any store carries the knee highs for less than a dollar and you can reuse them for all your dryer balls.
I washed in hot water, then threw in the dryer on high heat for 20 minutes. Repeated a second time, then took the balls out of the nylons and wrappped more wool tightly around these felted balls until they were size of a tennis ball or baseball. Put them back in the nylons, washed and dried again with heat.

Once I dried them for the last time, I took them them out of nylons and throw them in my dryer. They pretty much stay there. My drying time (except denim) has reduced about 25% and the clothes are softer (eliminating the need for dryer sheets). Sheets and light cotton dries about 40% faster.

I am just now finishing the book Miserly Mom by Jonni McCoy. Watch for a future post reviewing this great book! She writes that every little bit helps. What seems like pennies add up when combined with other efforts to reduce spending.

Thursday, April 21, 2011

Litttle Bit O' Fun!

My Musical Cowboy!


Celebrating a 3rd birthday with a friend!

Tuesday, April 19, 2011

Tupperware!

I love all things Tupperware! Really, I do. My husband would like to believe this is just my latest whim, but really it is a love affair with kitchen products that are safe, unbreakable, and timeless.


Today I am testing out my Stack Cooker. I am baking a chocolate cake and topping it with Cinnamon Vanilla Chocolate Frosting. In less than 15 minutes
total!


For convenience today I have my favorite chocolate cake mix, and made it as directed. Then taking my saucy green spatula I poured the batter into my Stack Cooker (lightly sprayed with cooking spray).

Yum!
I popped it into the microwave on high for 11 minutes. Yes eleven! Long gone are the days of being so behind I have to stop at the grocery store for pre-made desserts on my way to a potluck or picnic!
After 11 minutes, I pulled it out to cool while melting my frosting and adding my Cinnamon-Vanilla spice. Pour over the cake while still hot.

Serve and enjoy!
This is my grandmother's finest china. She had a Stack Cooker for as long as I can remember. I just didn't know how awesome it was until having my own kitchen to cook in. In 15 minutes I was enjoying a cup of tea, eating warm, delicious cake while thinking of her.

Monday, April 18, 2011

My Cup Runneth Over, and so does my Vase!


When I moved into my 51 year old house, I was sure that we would have pretty spring flowers in the yard, but I was so wrong. Finally last year I bought myself some bulbs for my birthday and planted them. This Spring they have come up beautifully. Daffodils are my favorite flower above all others. I just love their bright yellow beauty that ushers in Spring and reminds me of the renewal Easter brings.


Andrew now 3 years old, has developed the most generous spirit. He is always looking for ways to give to those he loves. These are the first flowers he has seen in our yard. With the weather turning much nicer lately, and getting our garden started. I am not the only one enjoying my Daffodils.

The boy has more than once come to me with a handful of fresh picked flowers for me with the most adorable grin on his face. I in the meantime and fighting the urge to cringe as I see my flower bed shrink!

For just a moment I am torn, then I realize... I only have a few short years that my little boy will be running in the house with a comical grin giving me flowers.


So my vase runneth over with, freshly picked flowers.
(Daily refreshed)


Rather than scold him, I am giving him hugs and thanking him for his creative generosity. I know there will be a day that I will look at the patch of flowers and wish my boys were still little enough to unknowingly pick mama's flowers because they love me. Yes that day will come entirely too soon.

Yet again instead of mother teaching child, he teaches his mother valuable lessons in accepting generosity.


Wednesday, April 13, 2011

HomeMaker Monday ~ Adventures in Saponification!

Making my own Soap

I finally built up to courage to try making my own soap. I have been following a great blog lately. Renee at
FIMBY has been inspiring me for a few months to step out and embrace my home-making creativity (among other areas of my life) and make some homemade soap.

Knowing that working with Lye is something one must be cautious about. I waited for a quiet moment in my house to assemble my supplies. A was at a friends house and L was playing happily in a playpen in the next room.


After reading up on the process, I now know I was nervous for nothing. It was actually an easy process.


I set the computer up on the opposite kitchen counter and played
Renee's video tutorial in the background to help me focus and remember what each step was. I didn't want to ruin the first batch.


Measuring out the lye...


...and stirring it carefully was what I felt I needed to be most careful about.


While waiting for the Lye solution to cool, I melted vegetable shortening. I didn't use any other oils in this batch I was just going for simple the first time around.


After pouring the lye into melted oils. Both liquids at about 110 degrees Fahrenheit blended to trace.


I chose my two favorite smells for this first batch. I later learned they can be irritating to some sensitive skins but since I plan to use it for Laundry and Dish soap. I think it will work out just fine.


Pouring the soap into a plastic lined shoe box to set for 24 hours before cutting.


The following day, the bars are cut and put on a rack to cure for about one month


I am going to have a hard time waiting the month that is takes to cure the bars. I love walking past the shelf they are curing on and smelling the Sweet Orange and Cinnamon wafting in the room. I won't lie it felt good to be creative and produce something for my family to use. My next soap making adventure I hope will produce some sweet smelling baby soap that is sensitive for my little boy's skin.

Whimsical Wednesday ~ How To Grow Trash Bag Potatoes


It is garden time! Everywhere we look the landscape is coming back to life and the world is green and colorful. This time of year my thoughts turn to gardening. This year I discovered a way to involve my three year old son. We are growing potatoes in trash bags. It is a super fun and simple. You don't need a big yard or a lot of money to do this project. The only think you will have to purchase is seed potatoes and cut them in quarters making sure each piece has an "eye". The rest of the items you should have around the house.

Getting Ready for the Fun!


Start by gathering the items you will need:
1. Seed potatoes can be found at a garden store or purchased through catalog companies.

2. A 30 gallon (or larger) black trash bag
3. 6 drink or soda bottles from your recycling bin
4. Dirt can be dug from your back yard or bought at your local garden center.

Second you start to assemble your bags. Lay the trash bags open on the ground gathering them up around the sides. Have your little one put the recycled bottles, or containers in the bottom of the bag. This is for drainage and so you won't have to use as much dirt to get the plants started.


The Dirt is the fun part for my son! Shovel or pour bagged dirt into the bags until you cover the containers about 2 inches.

Next lay the potatoes with the "eyes" up, about 3 - 4 inches from each other. Cover with another 2-3 inches of dirt. Water until the dirt is saturated.


Lastly, put some paper mulch on top (straw works great too), and poke holes in the bag near the bottom for drainage.


Watch for the potatoes to sprout. When they have grown about 4 inches above ground cover them with another 2-3 inches of dirt. You will do this throughout the summer. Your bag will slowly fill with dirt. When the plants flower, you can gently dig out a few New Potatoes to eat leaving the rest to mature.

Near the end of the summer if you want you can plant Green Beans on top of the dirt. They will provide nutrients for the soil and more opportunity to grow vegetables with your little ones.
When the Potato plants are dead and dry and your Green Beans have finished simply cut the bag down the side and dig out the potatoes. Return the dirt to your flower gardens or yard for the winter.